<Component Thruk::Plugin::BP>
    objects_save_file      = /etc/icinga2/conf.d/thruk_bp.conf
    objects_templates_file = /etc/icinga2/conf.d/thruk_templates.conf
    objects_save_format    = icinga2
</Component>
Business Process
Thruk comes with a business process engine which allows you to design, operate and illustrate your business intelligence models. It is possible to span business prosesses across multiple sites, but the calculation will happen all in one single local site. Thruk needs to able to access the 'check_results' folder to submit results and a config file to create hosts and services for your objects.
In 'edit mode' nodes can be changed by right-clicking them and select 'Edit Node'. General options, like using hard or soft states can be changed in the 'General' Tab of any node.
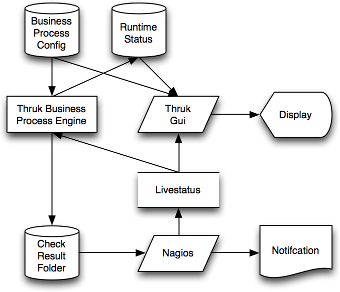
How it works
Business Process Workflow
-
'Thruks Business Process Engine' is usually by cron, which is automatically added if you create your first business process.
-
'Business Process Config' and 'Runtime Status' are JSON files which are used to store objects and status
-
Results are submited to Naemon by using the check_results folder or by livestatus.
-
'Livestatus' will be used to fetch input data for the calculation itself.
Setup
If you are not using OMD, you will have to do some manual steps:
-
copy the <Component Thruk::Plugin::BP> block from your /etc/thruk/thruk.conf into your thruk_local.conf in order to make some local adjustments.
-
copy the Thruk BP Templates from either github or /usr/share/thruk/thruk_templates.cfg into your naemon conf.d folder, ex .:/etc/naemon/conf.d/thruk_bp_templates.cfg
-
add default contacts or contactgroups to Thruk BP Host Template (thruk-bp-template)
-
change the 'objects_templates_file' to that location.
-
create an empty file thruk_bp_generated.cfg, ex.: /etc/naemon/conf.d/thruk_bp_generated.cfg
-
change 'objects_save_file' to that location.
-
make that file editable for the webserver/thruk user. ex.: 'chown www-data: /etc/naemon/conf.d/thruk_bp_generated.cfg'
-
change the 'spool_dir' to ex.: /var/naemon/rw/check_results or whatever your naemon 'check_result_path' points too. You could also reuse an existing backend by specifying 'result_backend'.
-
make sure your webserver/thruk user is allowed to write to that folder, ex.: 'chgrp www-data /var/naemon/rw/check_results && chmod g+rwx /var/naemon/rw/check_results'
-
set 'objects_reload_cmd' to "sudo -u naemon /etc/init.d/naemon reload". You will need to add sudo permissions to get this working. ex.: put "thruk ALL=(ALL) NOPASSWD: /etc/init.d/naemon" in your /etc/sudoers.
Integration in Naemon
Thruk will create Hosts and Services for selected nodes of your business model. That way it is possible to send notifications, even for sub steps of the business process. The business process itself will be created as Naemon Host object and all selected nodes will be created as Service objects.
To make that work, you will need 2 files:
-
Thruk BP Templates (see an example on github)
-
Thruk BP Objects
Both file locations can be changed in your 'thruk_local.conf'. The templates file is user maintained, while the objects file will be overwritten by Thruk whenever you change a business process. Also make sure Thruk is allowed to write the objects file.
In order to make integration as simple as possible, you can only choose from different templates which can be edited by the Thruk Config Tool or manually in the 'objects_templates_file' file.
The name of the business process will be used as hostname, so make sure it does not clash with existing hosts by using a uniq prefix or something similar.
|
notifications
As each business process will result in at least one host and one service. It is recommended to setup notifications on the service, because the host will almost always be ok and only change the state if some internal error happens. |
Integration in Icinga2
In order to integrate Thruk Business Processes in Icinga2 you will need a minimal configuration like:
The Icinga 2 template file can be optained from github.
Make sure Thruk is able to write to the /etc/icinga2/conf.d/thruk_bp.conf file.
Creating New Business Processes
In order to change or create business processes, you need these roles from the cgi.cfg.
-
authorized_for_configuration_information
-
authorized_for_system_commands
Then simply model your business process from the web gui.
Configuration
Configuration settings are covered by the configuration sections.
Custom Functions
Besides the normal functions you can write your own aggregation functions
easily. Custom functions are written in Perl and are located in the <config
dir>/bp/ with the .pm filename extension. The function name must end with
function to distinguish them from custom filters.
Example: /etc/thruk/bp/echo.pm
# echofunction:
#
# This function just echoes the
# provided text sample and optionally
# reverses the text.
#
# Arguments:
# arg1: Text;      text;     text that should be echoed
# arg2: Reverse;   checkbox; yes; no
# arg3: Uppercase; select;   yes; no
sub echofunction {
    my($c, $bp, $n, $args, $livedata) = @_;
    my($text, $reverse, $upper) = @{$args};
    $text = scalar reverse $text if $reverse eq 'yes';
    $text =             uc $text if $upper   eq 'yes';
    return(0, $text, $text, {});
}
Input arguments are:
-
$c: thruk context object containing livestatus connection pool
-
$bp: business process object
-
$node: business process node object
-
$args: array ref of arguments from the node edit dialog
-
$livestatus: optional livestatus data for all hosts and services in this business process
A custom aggregation function needs to return at least 3 values and an optional 4th hash.
-
status code: 0 = Ok, 1 = Warning, 2 = Critical, 3 = Unknown
-
node sub label: short text used inside the node
-
textual output: text output of aggregation function with optional performance data
-
extra arguments: hash list of node attributes which will be overridden.
Arguments can be specified by comments in the perl module containing your function. See the example above… Each Argument requires 3 attributes which are seperated by a semicolon ;
# arg1: Text; text; text that should be echoed
-
Name: name of this attribute, used in the edit dialog
-
Type: can be any of 'Text', 'Select', 'Checkbox', 'Host', 'Hostgroup', 'Service', 'Servicegroup'.
-
Options: optional arguments. In case of Text used as placeholder, in case of Select or Checkbox used as semicolon seperated list of options.
|
perl
All custom aggregation functions have 'use warnings' and 'use strict' enabled by default and run in 'Thruk::BP::Functions' context, means they have access to all normal aggregation functions and helpers from link:../api/Thruk/BP/Functions.html |
Scripted Business Processes
It is a total valid use case to generate business process from a custom script.
-
Simply generate and write out the json structure into your
bpfolder. -
Run
thruk bp committo update cronjobs and generate objects.
The bp folder is usually in ~/var/thruk/bp/ when using OMD or /var/lib/thruk/bp otherwise.
There are a few extra attributes you can add to your nodes when exporting them:
Extra Node Attributes
-
create_obj: if set to 1, node will be exported as service. -
host_name: use this host to add the exported service to. -
service_object_attributes: hash list of extra attributes added to this service. -
host_object_attributes: hash list of extra attributes added to the host container of the business process. (only useful for node1)
Extra BP Attributes
-
create_host_object: if set to 0, no bp host object will be exported. You are then responsible that this host does exist.
Other attributes should be mostly self explaining and can be adopted from a manual
created business process by looking at the file in your bp folder.